


How to Use a Laser Level for Flooring and Tile | CIGMAN
Three hours into your tile job, you stand up, squint down the first row, and notice it’s off. Not by much. But enough that you know the grout lines will drift by the time you reach the far wall.
A cross-line laser level prevents that. But using one correctly for flooring and tile requires understanding two things most guides skip: the difference between flat and level, and why room center is your real starting point. Here is the full workflow.
Flat vs. Level: The Distinction That Can Ruin a Floor
A level floor sits at constant elevation across its surface, the way water sits still. A flat floor has no humps, dips, or ridges, regardless of whether the whole surface tilts slightly in one direction.
For flooring and tile, you need flat. Level is a bonus.
A cross-line laser level gives you a true horizontal reference line, which is essential for layout. But it cannot measure the humps and dips beneath your feet. That job belongs to a 6-foot metal straightedge. As one r/Flooring regular put it: “Your floor doesn’t have to be perfectly level. It just needs to be flat.”
The industry defines flatness using specific tolerances:
- Hardwood, mechanical nail (≥1⅝"): ¼" per 10 ft or 3/16" per 6 ft NWFA Ch. 4
- Hardwood, glue-down or short nail (<1⅝"): 3/16" per 10 ft or 1/8" per 6 ft NWFA Ch. 4
- Standard tile (any edge <15"): ¼" per 10 ft TCNA / ANSI A108.02
- Large-format tile (any edge ≥15"): 1/8" per 10 ft TCNA / ANSI A108.02
- Maximum lippage (height difference at tile joint): ≤1/32" ANSI A108.02
One r/Flooring user measured a 21-foot bedroom and found 7/8" of variation from high point to low. The flooring manufacturer required 3/16" per 8 feet. Without scanning first, that floor would have failed early. And as another pro noted in the same thread: “I’m a machinist by trade, so 3/16 of an inch is 5 miles in my world.”
What You Need Before You Start
Tools and materials:
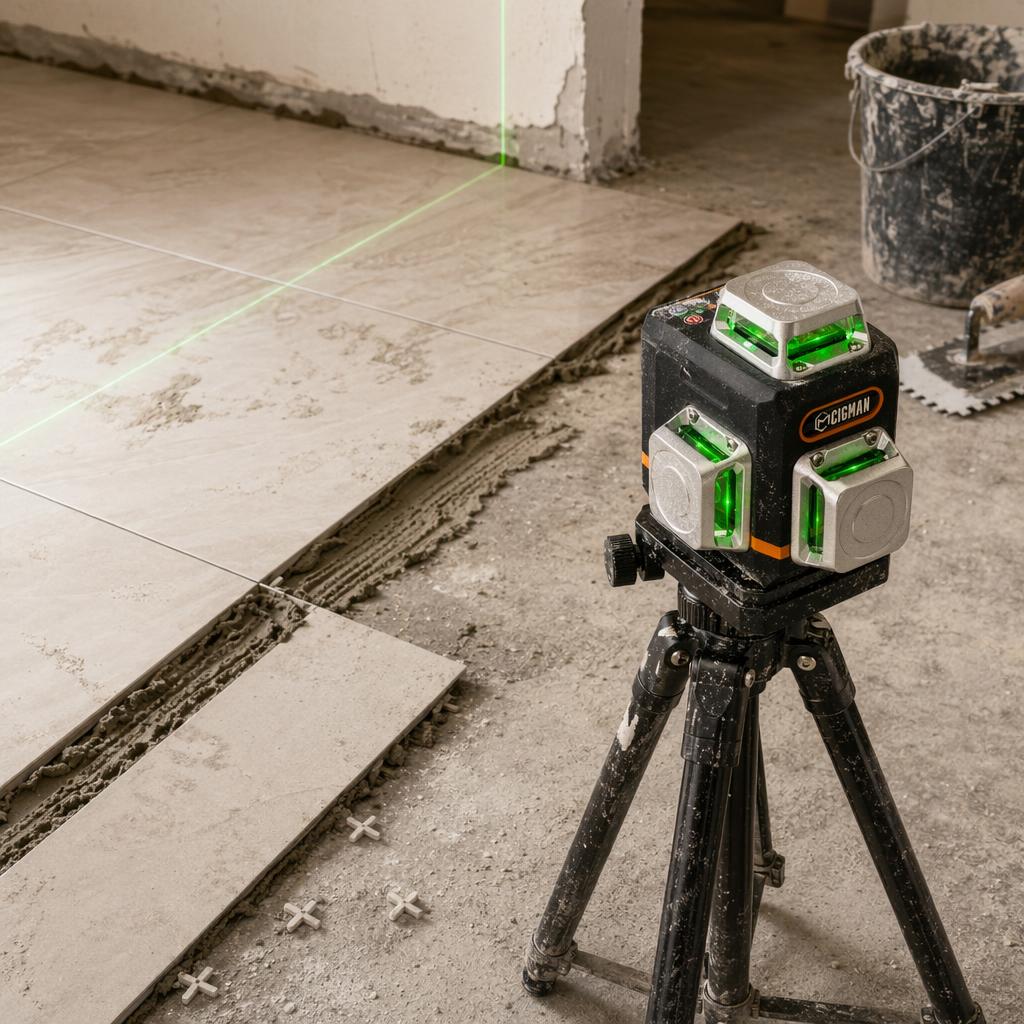
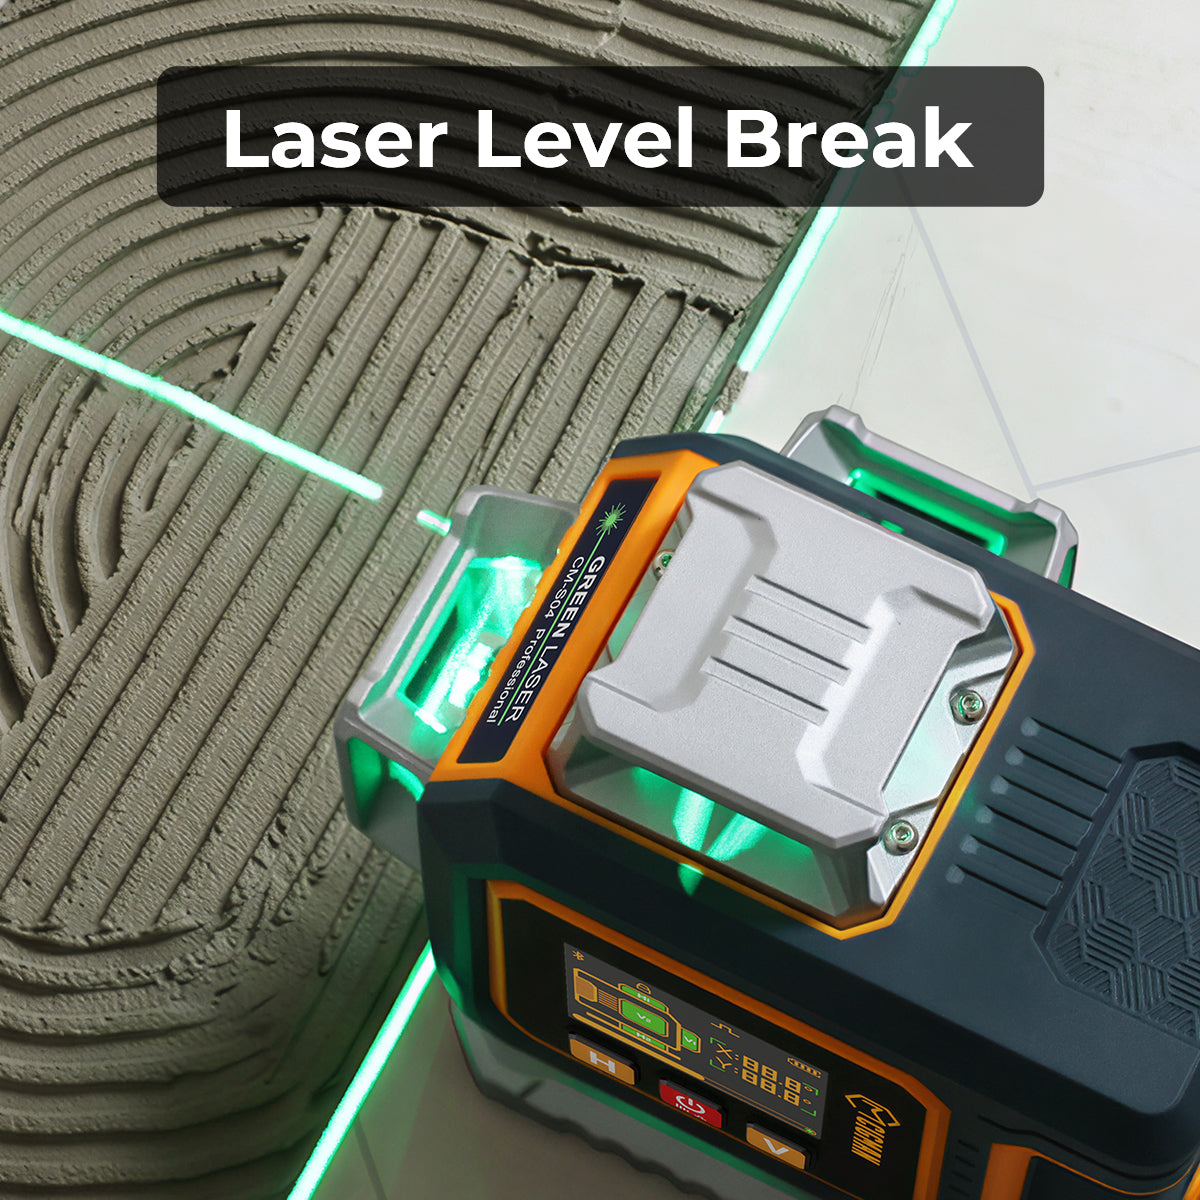
- CIGMAN CM-701 3×360° self-leveling green laser level
- Tripod or adjustable floor stand
- 6-foot metal straightedge
- Chalk line reel and chalk
- Tape measure and pencil
- Graph paper for grid measurements
- Angle grinder with diamond cup wheel (if high spots need grinding)
- Self-leveling compound and mixing paddle (if low spots exist)
- N95 dust mask or better (required if grinding concrete or subfloor)
Room conditions required: Temperature 65–75°F and relative humidity 30–50% for at least 7 days before, during, and after installation (NWFA requirement). On a concrete slab, verify RH ≤ 75% using an in-situ probe test (ASTM F2170) before proceeding.
Step 1: Check Subfloor Flatness (Before Anything Else)
- Position the CM-701 at room center on a tripod. Switch to horizontal line mode. Let it self-level (about 10 seconds), then wait 2–3 additional minutes for the optics to thermally stabilize before recording any measurements.
- Sketch a measurement grid. On graph paper, outline the room. Mark a measurement point every 4 feet across the entire floor. A 12×16-foot room produces roughly 12 grid points.
- Measure each point. Hold a tape measure vertically at each grid point. Record the distance from the laser line down to the floor. A smaller number means the floor is higher at that spot (closer to the beam). A larger number means the floor is lower (farther from the beam).
- Calculate total variation. Subtract your minimum reading from your maximum. Compare against your tolerance standard: ¼" per 10 ft for hardwood (mechanical nail) or standard tile; 1/8" per 10 ft for large-format tile (any edge ≥15").
- Mark problem zones. Circle high spots (small tape reading) and low spots (large tape reading) on your sketch. These zones need correction before any flooring or tile goes down.
One r/Flooring beginner found 7/8" of variation across a 21-foot room. The flooring manufacturer allowed 3/16" per 8 feet. Skipping this scan is the most common reason DIY floors fail early or require re-laying entire sections.
Step 2: Fix High and Low Spots
- Grind high spots first. Work in short passes with a diamond cup wheel, checking frequently with your straightedge. Do not start filling low spots until all grinding is complete. Grinding generates silica dust. Under OSHA 29 CFR 1926.1153, use an N95 respirator at minimum. Wet-grinding or a HEPA vacuum attachment dramatically reduces airborne particles.
- Re-scan the ground areas. Reset the CM-701 and re-measure any area you ground. Confirm the high spots are now within tolerance before mixing self-leveling compound.
- Mix the self-leveling compound carefully. Follow the manufacturer’s water ratio. Too much water reduces final strength; too little reduces flow. “Self-leveling is not really self-leveling,” one r/Flooring pro noted. “It’s more like self-flattening.” The compound flows toward low areas but will not build up over any high spots you missed.
- Pour and distribute. Work from the far end of the room toward the exit. Pour along each low zone. Use a gauge rake for large areas. Keep doors and windows closed during application and curing.
- Re-verify after curing. Wait the full cure time listed on the bag, typically 24 hours. Self-leveling compound shrinks slightly as it cures. Run your CM-701 grid measurement again before laying any material. Do not assume the floor is flat without verifying.
Self-leveling compound requires floor surface temperature between 50°F and 90°F. In a basement in winter, the concrete slab can be below 50°F even when the air temperature is higher. Use a contact thermometer on the slab before mixing.
Step 3: Find Room Center and Establish Reference Lines
Starting from a corner pushes accumulated measurement error toward the opposite walls. In a room that is slightly out of square (and most are), corner-first layouts produce a visible fan effect by the time you reach the far end. Starting from center distributes any adjustment equally to all four sides.
The traditional trammel point method for establishing perpendicular reference lines, as described in NWFA Installation Guidelines Appendix G, takes 17 steps using hand-scribing arcs and flat boards. The CM-701 replaces that process in one setup.
- Find the midpoint of each wall. Measure each wall and mark the midpoint. Snap chalk lines connecting midpoints of opposite walls. The two lines cross at the room’s center point.
- Position the CM-701 directly over the center point. Activate cross-line mode so both the horizontal and vertical planes are live. The laser projects two perpendicular reference lines across the full floor.
- Verify square with the 3-4-5 check. Along one laser line on the floor, mark a point 3 feet from center. Along the perpendicular laser line, mark a point 4 feet from center. The diagonal distance between these two marks must equal exactly 5 feet. If it does, your lines are at 90 degrees. Adjust the laser position slightly if needed, then re-verify before snapping chalk lines.
- Snap chalk lines along the laser reference. With the CM-701 holding position, snap chalk lines along both projections across the full floor. These are your permanent layout guides.

The same squaring approach applies when setting posts on a patio slab or outdoor project. See how to use a laser level for deck posts for the outdoor version of this layout workflow.
Step 4: Plan Your Tile or Flooring Layout
With two perpendicular chalk lines crossing at room center, check edge cuts before laying any material.
- Dry-fit a row from center to wall. Lay tiles (or flooring boards) without adhesive from your center line to the nearest wall. Note the cut width at the wall. If it is narrower than half a tile, shift your chalk line by half a tile width in that direction. This gives equal cuts on both sides.
- Snap revised center lines if needed. Erase the old chalk mark and snap a new line at the adjusted position. Re-run the 3-4-5 square check before proceeding.
- Mark the expansion gap. For hardwood and engineered flooring, plan a ½" expansion gap along all walls and fixed objects, a requirement per NWFA Appendix L. Mark this setback on the subfloor so you do not lay material into the gap zone.
- Mark your laser position with tape. Place a small tape mark on the subfloor directly below the laser’s center point. If you need to move the laser during installation, returning it to this spot lets you re-establish the original reference without re-snapping chalk lines.
If you are also installing a suspended ceiling in the same room, the CM-701’s 360° coverage handles both the floor reference and ceiling-height transfer in one setup. See how to use a laser level for ceiling work for the ceiling measurement steps.
Step 5: Install Using the Laser as Your Guide

- Place the first piece at the chalk-line intersection. Set your first tile or flooring board with its corner at the center point. This is the most critical placement in the job. Every subsequent piece references back to it.
- Use the laser for elevation reference, not flatness verification. The CM-701 projects at ±0.3mm/m accuracy, which meets both TCNA requirements for standard tile (¼"/10ft) and large-format tile (1/8"/10ft). It tells you that tile tops are at a consistent elevation relative to the reference plane. But lippage, the height difference between adjacent tile edges, must be checked with a straightedge held across each joint. Target: ≤1/32" per ANSI A108.02. You can feel unsafe lippage by pressing a fingertip firmly along each joint.
- Check alignment every 3–4 rows. After each set of rows, squat down and look along a grout line toward the laser beam. Any drift becomes visible at low angle immediately. Correct before continuing.
- When moving the laser, re-establish the reference. Before repositioning, mark two reference points on the wall from the current laser line. After moving, swing the beam to match both wall marks and verify against a chalk line before continuing.
- Final sweep with the straightedge. After installing each section, drag your 6-foot straightedge across the installed surface in multiple directions. Target ≤1/8" per 6 ft for tile, ≤3/16" per 10 ft for hardwood. Any high tile needs the mortar bed adjusted before the adhesive cures.
For projects that also involve grading or leveling concrete outside, the same height-transfer technique from Steps 1 and 3 applies outdoors. See how to use a laser level to level ground for the outdoor measurement workflow.
Frequently Asked Questions
Do I need a laser level for tile installation, or will chalk lines work?
Chalk lines mark straight paths, but they do not confirm whether those paths are level or whether the room is square. A cross-line laser level gives you both: a true horizontal reference and two perpendicular lines that verify your layout is square before the first tile goes down. For large rooms, diagonal tile patterns, or large-format tile where flatness tolerance is tight, the laser is essential.
What is the difference between a 2-line and 3-plane laser level for flooring?
A 2-line laser projects one horizontal and one vertical beam. A 3-plane laser like the CM-701 projects three full 360-degree planes: one horizontal and two vertical. For flooring, the 360-degree horizontal plane means you transfer the same level reference to all four walls simultaneously, which saves time in large rooms or when checking adjacent spaces without repositioning.
How do I know if my subfloor is flat enough for large-format tile?
TCNA requires flatness within 1/8" per 10-foot span for tile with any edge 15" or longer. Set the CM-701 in horizontal mode and measure the distance from the laser beam to the floor at grid points every 4 feet. If the variation from high to low exceeds 1/8", the subfloor needs grinding or self-leveling compound before tiling.
Can I use a laser level to check for high and low spots?
Yes. Set the laser on a tripod at room center, project the horizontal line, and measure the distance from the beam to the floor at each grid point. Smaller measurements indicate higher floor areas (closer to the beam). Larger measurements indicate lower areas. Record all measurements on a room sketch to map the full pattern before deciding where to grind or fill.
Does the CM-701 work for flooring on concrete slabs?
Yes. The CM-701 self-levels on any stable surface and its ±0.3mm/m accuracy meets NWFA concrete subfloor requirements (1/8" per 6 ft or 3/16" per 10 ft) and TCNA tile requirements. For outdoor or bright-light conditions, note that laser visibility drops significantly in direct sunlight. Use the laser for grid measurements during early morning, or transfer marks with chalk before sunlight angle changes.
References
References (6)
- National Wood Flooring Association, Installation Guidelines, NWFA, St. Louis, MO, Rev. April 2008. [Online]. Available: https://nwfa.org/installation/
- National Wood Flooring Association, Wood Floor Facts: Moisture and Wood Floors, NWFA, St. Louis, MO. [Online]. Available: https://nwfa.org/resource/wood-floor-facts-moisture-and-wood-floors/
- Tile Council of North America, Handbook for Ceramic, Glass, and Stone Tile Installation, TCNA, Anderson, SC, 2023. [Online]. Available: https://tcnatile.com/products/publications/2023-tcna-handbook-for-ceramic-glass-and-stone-tile-installation/
- American National Standards Institute / Tile Council of North America, “Specifications for Installation of Ceramic Tile,” ANSI A108.02, 2023. [Online]. Available: https://tcnatile.com/product-category/publications/
- Occupational Safety and Health Administration, “Occupational Exposure to Respirable Crystalline Silica,” 29 CFR 1926.1153, OSHA, Washington, DC. [Online]. Available: https://www.osha.gov/silica-crystalline
- ASTM International, “Standard Test Method for Relative Humidity in Concrete Floor Slabs Using in situ Probes,” ASTM F2170-19a, ASTM, West Conshohocken, PA, 2019. [Online]. Available: https://www.astm.org/f2170-19a.html


Leave a comment
This site is protected by hCaptcha and the hCaptcha Privacy Policy and Terms of Service apply.